Lab Activity: Fractals with Turtle
In this assignment, you’ll use the Turtle graphics system that we introduced in class, along with your powerful new recursion techniques, to create fractals. A fractal is a simple pattern that repeats itself on smaller scales, resulting in attractive pictures.
Part 1: Fractal Tree
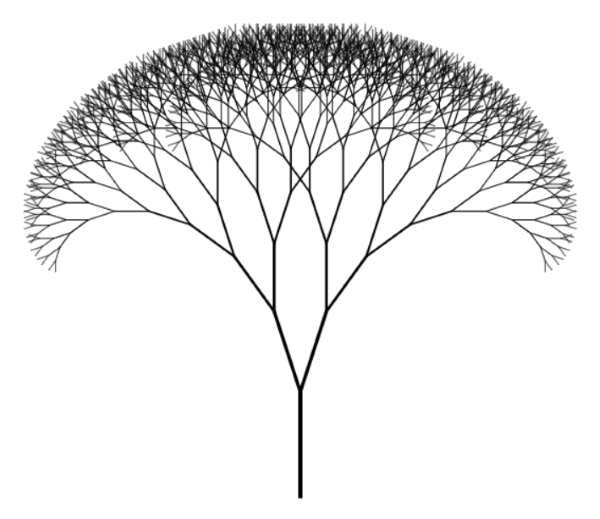 An example of a fractal tree, very similar to the one we will make today with Turtle.
 Image source
We’re going to start with fractal trees. A fractal tree is a graphic in which a single line divides into two or more lines at an angle, repeatedly. The result is an elegant tree-like structure.
0. Create Your Script
Make a new file called fractal-tree.py and save it somewhere you’ll be able to find it.
1. Draw a Vertical Line
Like last time, we’re going to practice incremental development. We’ll start with a very simple function. Then, at each stage, we’ll add just a bit of complexity until we achieve the behavior that we are looking for.
Here’s the first step:
- Define a function called
draw_tree()that accepts a single argument calledlength. - This function should cause the turtle to move forward by
length, and then backwards by the samelength. So, the turtle ends where it started.
Call your function like this:
draw_tree(100)At this stage, the expected result is that your turtle moves up and then down, tracing a single vertical line.
Hint: Remember that you can move the turtle forward with the command turtle.forward(length).
2. Pause to Look Around
Next, make your turtle look around after the forward step and before the backward step.
- Add an argument to
draw_tree()calledangle. - After the forward step, make the turtle turn
angledegrees to the right. - Then, make the turtle turn
2*angledegrees to the left. - Make the turtle turn
angledegrees to the right again. - Then finish with the backward step.
Call your function like this:
draw_tree(100, angle = 90)The end result is still a simple vertical line. When you run the file, you should still see your turtle move straight up and down. After it moves up, though, you should see it “look around” to both the right and the left before returning to the starting point.
Hint: Remember that you can make the turtle turn left with turtle.left(angle).
3. Establish the Base Case
We are going to use recursion to draw the tree. Modify your function in the following ways:
- Add an argument to your function called
level. - Add an
if-statement to your function. Check iflevel == 0. If so, do nothing! You can do nothing by simply writingpassinside the body of theif-statement. This is our base case. - In the
elseclause, place the code you’ve written previously.
Call your function twice:
draw_tree(100, angle = 90, level = 0) # should do nothing
draw_tree(100, angle = 90, level = 1) # should do same thing as in Part 2
4. Implement the Recursive Step
This is where the magic happens! Add two recursive function calls, one immediately after the turtle turns right and another immediately after the turtle turns left.
Each call should decrease the length and the level.
- Decrease
lengthby a multiple. For example, the newlengthis 75% of the oldlength. - Decrease
levelby 1. For example, if the previouslevelwas 5, the newlevelis 4.
The purpose of decreasing the level is to ensure that your function will eventually stop.
Here’s a sample function call and result:
 Example output for a tree with 3 levels.
draw_tree(100, angle = 45, level = 3)Your result might be a little different, depending on exactly how you chose to reduce the length in each step. In any case, however, you should see a “tree” with two large branches and four smaller branches.
Here’s another one. The first command makes the turtle move more quickly, which is helpful when the figure gets more complex.
 Example output for a tree with 7 levels
turtle.speed(.1)
draw_tree(100, angle = 15, level = 7)
5. Make Some Pretty Pictures!
Play a little with all three arguments of the draw_tree() function in order to produce some attractive trees.
6. Leaves
 Example output for the “Leaves” problem.
The commands turtle.color("green") and turtle.color("brown") will change the color of the line drawn by the turtle. The command turtle.circle(4) will draw a circle. Using these new commands, add color and leaves to your tree.
If your implementation results in each branch having two green circular leaves (like mine does above), explain this: why are there two circles on each branch?
Part 2: Koch Curve
In the second part of this lab, we are going to draw a fractal called the Koch curve, again using recursive techniques and the turtle module.
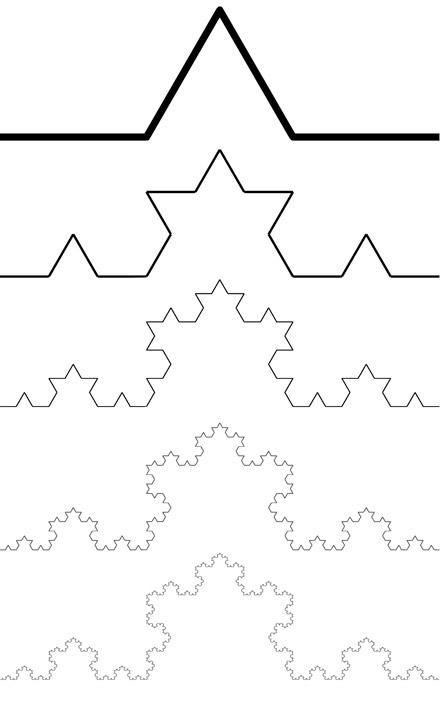 Five “generations” of the Koch curve.
The Koch curve is defined by a sequence of generations. The zeroth generation is just a straight, horizontal line. In the first generation, we replace the middle third of that line with two sides of an equilateral triangle (see figure at left, first row). Then, we replace each middle third of each line in THAT shape with two sides of an equilateral triangle (second row). We continue this process, producing a complicated-looking snow-flake like structure like the one at the bottom of the figure on the right.
Let’s create Koch curves using the turtle module.
0. Create your script
Create a new Python file called koch-curve.py and save it somewhere where you’ll be able to find it.
1. Add Some Boilerplate
def draw_scene():
    """Setup the canvas for drawing the curve and draw it."""

    # pick up the pen and move the turtle so it starts at the
    # left edge of the canvas (don't worry about this yet)
    turtle.up()
    turtle.goto(-turtle.window_width()/2 + 20, 0)
    turtle.down()

    # draw the curve by calling your function
    draw_koch(200, 0)

    # finished
    turtle.done()

draw_scene()
Copy and paste the code above into your script file. This code is primarily just here to make the drawing look a bit nicer. Your job is to implement the function draw_koch().
2. Define draw_koch()
Declare the function draw_koch() so that it takes two arguments, called length and levels. We are going to implement this function in a recursive fashion.
3. Write the Base Case
Start by writing an if-statement, with the if clause corresponding to the base case:
- When
levelsis 0, draw a straight line of lengthlength, using theturtle.forward(length)command.
You might find it useful to refer to some of the examples from our lecture notes on recursion in order to structure this code. The power example might be especially useful.
4. Run your script
At this point, running your script should cause the turtle to draw a line. That’s it!
5. Begin the Recursive Case
Now we are going to start working on the recursive case. Here’s how it should work:
If levels is greater than 0, draw a “first generation curve.” A first-generation curve is like the one at the very top of the diagram in this activity. To draw this curve:
- Move forward by distance
length/3. - Turn left by 60 degrees.
- Move forward by distance
length/3. - Turn right by 120 degrees.
- Move forward by distance
length/3. - Turn left by 60 degrees.
- Move forward by distance
length/3.
6. Test
Modify the function draw_scene by replacing draw_koch(200, 0) with draw_koch(200, 1). Check that the output resembles the shape at the top of this section.
7. Implement Recursion
Ok, time for some recursion! In your draw_koch() function, in the recursive case, replace all four calls to go forward with calls to draw_koch(). The arguments to draw_koch() should be length/3 and levels - 1.
8. Test!
Modify draw_scene() so that we draw a koch curve with 6 levels. You should see a shape resembling the bottom one in our introductory diagram. I would suggest adding the line turtle.tracer(False) before you actually call draw_scene(). This will skip the animation, showing you only the final product. You might also want to increase the length: 1000 worked pretty well for me.
9. A Special Snowflake
Write and call a function called draw_snowflake(length, levels). Your function should:
- Call
draw_koch(length, levels). - Turn to the right by 120 degrees.
- Repeat the above commands two more times.
Then, write a function called draw_scene2(). You can start by copying draw_scene(). Then, within draw_scene2(), draw at least three snowflakes. Your snowflakes should not overlap (use turtle.up() and turtle.down() to move the turtle without drawing a line). Each of the different snowflakes should have different values of length and levels. If you’d like, you can also use commands like turtle.color("red") to change the color of the turtle for each snowflake.
Submit Your Scripts
Please submit both the files fractal-tree.py and koch-curve.py on Gradescope, including the names of both you and your partner with your submission. We are not autograding this assignment, so you don’t need to worry about whether you have exactly the expected output when the functions are called. You just need to check that your functions work correctly and that you have followed the instructions throughout this assignment.
Nice work!
© Philip Claude Caplan, Andrea Vaccari, and Phil Chodrow, 2022